Homework 5
In this homework, we will implement a neural vision system for an autonomous driving agent in SuperTuxKart.
This assignment, as with all of the homework assignments, should be completed individually without sharing solutions, models, or ideas with other students. See details at the bottom of this page.
Setup and Starter Code
Starter code for this assignment is provided here.
For this assignment, you will also need to install python bindings for
SuperTuxKart – these are available in the pip package PySuperTuxKart.
If you are using Google Colab for training, you will need a slightly different starter notebook than we have used for previous assignments. That notebook is here.
Note: if you are working in a Windows environment, we recommend using Anaconda
to set up an environment for this homework. The PySuperTuxKart package has some
annoying compilation details which are handled by Anaconda. In order to do
this, you can create a new conda environment then use the environment.yml
file included with the starter code to install all dependencies except
PySuperTuxKart. After that, install PySuperTuxKart through pip.
If you have any problems setting up the environment, please post them on Piazza.
Controller (30pts)
In the first part of this homework, you will write a handwritten controller in
controller.py. This controller takes an aim point and the current velocity of
the kart and should return a pystk action. The aim point is an (x, y) point
on the screen where (-1, -1) is the top left corner and (1, 1) is the bottom
right corner. This aim point is a point at the center of the track 15 meters
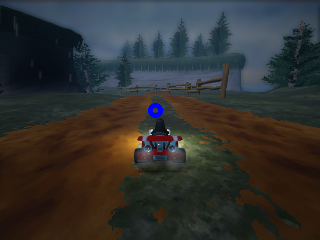
ahead of the current kart position, as in this image:
For this part of the assignment, we will use the ground truth aim point extracted directly from the simulator. In the next part of the homework, we will replace this ground truth aim point by a point predicted by a neural network.
The goal of this low-level controller is to steer the kart toward the aim
point. Your controller should return a pystk.Action. (This is the same type
of value we used in the in-class imitation learning exercise.) You can specify
the following values for the action:
steer: the steering angle of the kart – float in [-1, 1];acceleration: the acceleration of the kart – float in [0, 1];brake: whether or not to brake – boolean;drift: whether or not to drift, which can be useful in tight turns – boolean; andnitro: whether to apply nitro for a boost of speed – boolean.
This controller does not require any deep learning. If you prefer to implement this entirely within numpy without using PyTorch, that’s totally fine. Your controller may still have hyperparameters which you will want to tune, but you won’t need gradient descent.
You can test your finished controller with
python -m homework.controller <track_name> -v
The reference solution completes the tracks in the following times:
zengardenandlighthouse: less than 50 secondshasciendaandsnowtuxpeak: less than 60 secondscornfield_crossingandscotland: less than 70 seconds
Note that all of these are in-game times, and the wall-clock time may be a little slower.
Hints:
- Add drift if the steering angle is too large (you’ll need to experiment to see what “too large” means).
- Target a constant velocity
- Steering and relative aim use different scales. Use the aim point and a tuned scaling factor to choose the right amount of steering.
- Make sure your controller can complete all tracks before moving on. The next part of your homework uses this controller to build a training set, so it’s important that it works.
Grading
We will grade your homework on the following six tracks: hacienda, lighthouse,
cornfield_crossing, scotland, zengarden, and snowtuxpeak. The grading is split
up into 5pts per track, and your score on each track is proportional to how far
around the track your controller is able to get within a certain time limit.
The time limit is different for each track, you can find details inside
grader/tests.py
Planner (70pts)
In this part of the homework, you will train a CNN to select an aim point on the image. This aim point will replace the ground truth label from the first part to create a complete driving system.
Data
First, use your low-level controller to collect training data for your planner.
WARNING: This creates a dataset in the folder drive_data. Make sure to
back up any data that may be overwritten.
python -m homework.utils zengarden lighthouse hacienda snowtuxpeak cornfield_crossing scotland
You may experiment with the list of levels used to generate data, but we recommend this set. Adding additional levels may generate an unbalanced training set and lead to some issues with the test grader.
You can visualize your training data with
python -m homework.visualize_data drive_data
Here are some examples from the master solution:

Model
You will now implement the Planner class in planner.py. The planner is a
torch.nn.Module which takes as input an image tensor and outputs the aim
point in the image coordinate (i.e., it should be a pair (x, y) of ints with x
in [0, 127] and y in [0, 95]). We recommend predicting a heatmap first and then
extracting the aim point using a spatial argmax layer as in the keypoint
exercise from class. Then write the training code in train.py and train as
usual with python -m homework.train.
Vision-Based Driving
Once you have completed all the parts of this homework, run
python -m homework.planner <track_name> -v
to drive using your CNN planner and low-level controller.
Grading
You will get up to 10pts each on the same six tracks that we use for testing the low-level controller, using the same scoring system. The last 10 points comes from an unseen test track which you did not train on. The test track is relatively easy.
Extra Credit
We will run a tournament with all the submissions. The top nine submissions will receive extra credit: first place gets 10 points, second gets 9 points, and so on until ninth gets 1 point.
Validation Grader
As always, the validation grader can be run at any time with
python -m grader homework -v
Note that this grader is using a different set of test data than we use for our grader, so there may be some difference between the two. The distributions will be the same so your grade should be similar between the two graders, unless the model is massively overfit to the validation set.
Submission
Once you are ready to submit, create a bundle by running
python bundle.py homework <eid>
then submit the resulting zip file on Canvas. Note that the grader has a maximum file size limit of 20MB. You shouldn’t run into this limit unless your models are much larger than they need to be. You can check that your homework was bundled properly by grading it again with
python -m grader <eid>.zip
Online Grader
The online grading system uses a slightly modified version of Python, so please make sure your code follows these rules:
- Do not use
exitorsys.exitas this will likely crash the grader. - Do not try to access files except for the ones provided with the homework zip file. Writing files is disabled.
- Network access is disabled in the grader. Make sure you are reading your
dataset from the
datafolder rather than from a network connection somewhere. - Do not fork or spawn new processes.
printandsys.stdout.writeare ignored by the grader.
Honor Code
You should do this homework individually. You are allowed to discuss high-level ideas and general structure with each other, but not specific details about code, architecture, or hyperparameters. You may consult online sources, but don’t copy code directly from any posts you find. Cite any ideas you take from online sources in your code (include the full URL where you found the idea). You may refer to your own solutions or the master solutions to prior homework assignments from this class as well as any iPython notebooks from this class. Do not put your solution in a public place (e.g., a public GitHub repo).
Acknowledgements
This assignment is very lightly modified from one created by Philipp Krähenbühl.